1) Stream Serving
Chapter Preview
목표
- Stream Serving 을 위한 Data Subscriber 코드를 작성합니다.
- Docker Compose 를 이용하여 Data Subcriber 를 생성합니다.
- Target DB 에 접속하여 예측값이 잘 쌓이고 있는지 확인합니다.
스펙 명세서
Stream Serving 을 위한 Data Subscriber 코드를 작성합니다.
psycopg2패키지를 이용하여 예측값을 저장할iris_prediction테이블을 Target DB 서버에 생성합니다.
kafka-python패키지를 이용하여 07. Kafka 파트에서 생성한 토픽에서 데이터를 가져올 수 있는 Consumer 를 구현합니다.- Topic name :
postgres-source-iris_data - bootstrap_servers :
broker:29092 - auto_offset_reset :
earliest - group_id :
iris-data-consumer-group - value_deserializer :
lambda x: loads(x)
- Topic name :
requests패키지를 이용하여 API 에 모델의 예측을 요청하고 예측값을 받습니다.
- 결과값을
iris_prediction테이블에 삽입합니다.
- 결과값을
Docker Compose 를 이용하여 Data Subscriber 를 생성합니다.
Target DB 에 접속하여 실제로 예측값이 잘 쌓이고 있는지 확인합니다.
해당 파트의 전체 코드는 mlops-for-mle/part8/ 에서 확인할 수 있습니다.
part8
├── Dockerfile
├── Makefile
├── README.md
├── data_subscriber.py
├── grafana-docker-compose.yaml
└── stream-docker-compose.yaml
0. 패키지 설치
이번 챕터에서 사용할 패키지들입니다.
pip install kafka-python requests psycopg2-binary
- kafka-python :
- Python 에서 Kafka 를 SDK 형태로 사용하도록 도와주는 Kafka Python Client 패키지입니다.
- 해당 챕터에서는 Consumer 를 구현할 때 사용합니다.
- requests :
- Python 으로 HTTP 통신이 필요한 프로그램을 작성할 때 가장 많이 사용되는 패키지입니다.
- API 를 호출할 때 사용합니다.
1. Architecture
이번 챕터에서 구현할 서비스들은 [그림 8-2]와 같습니다.
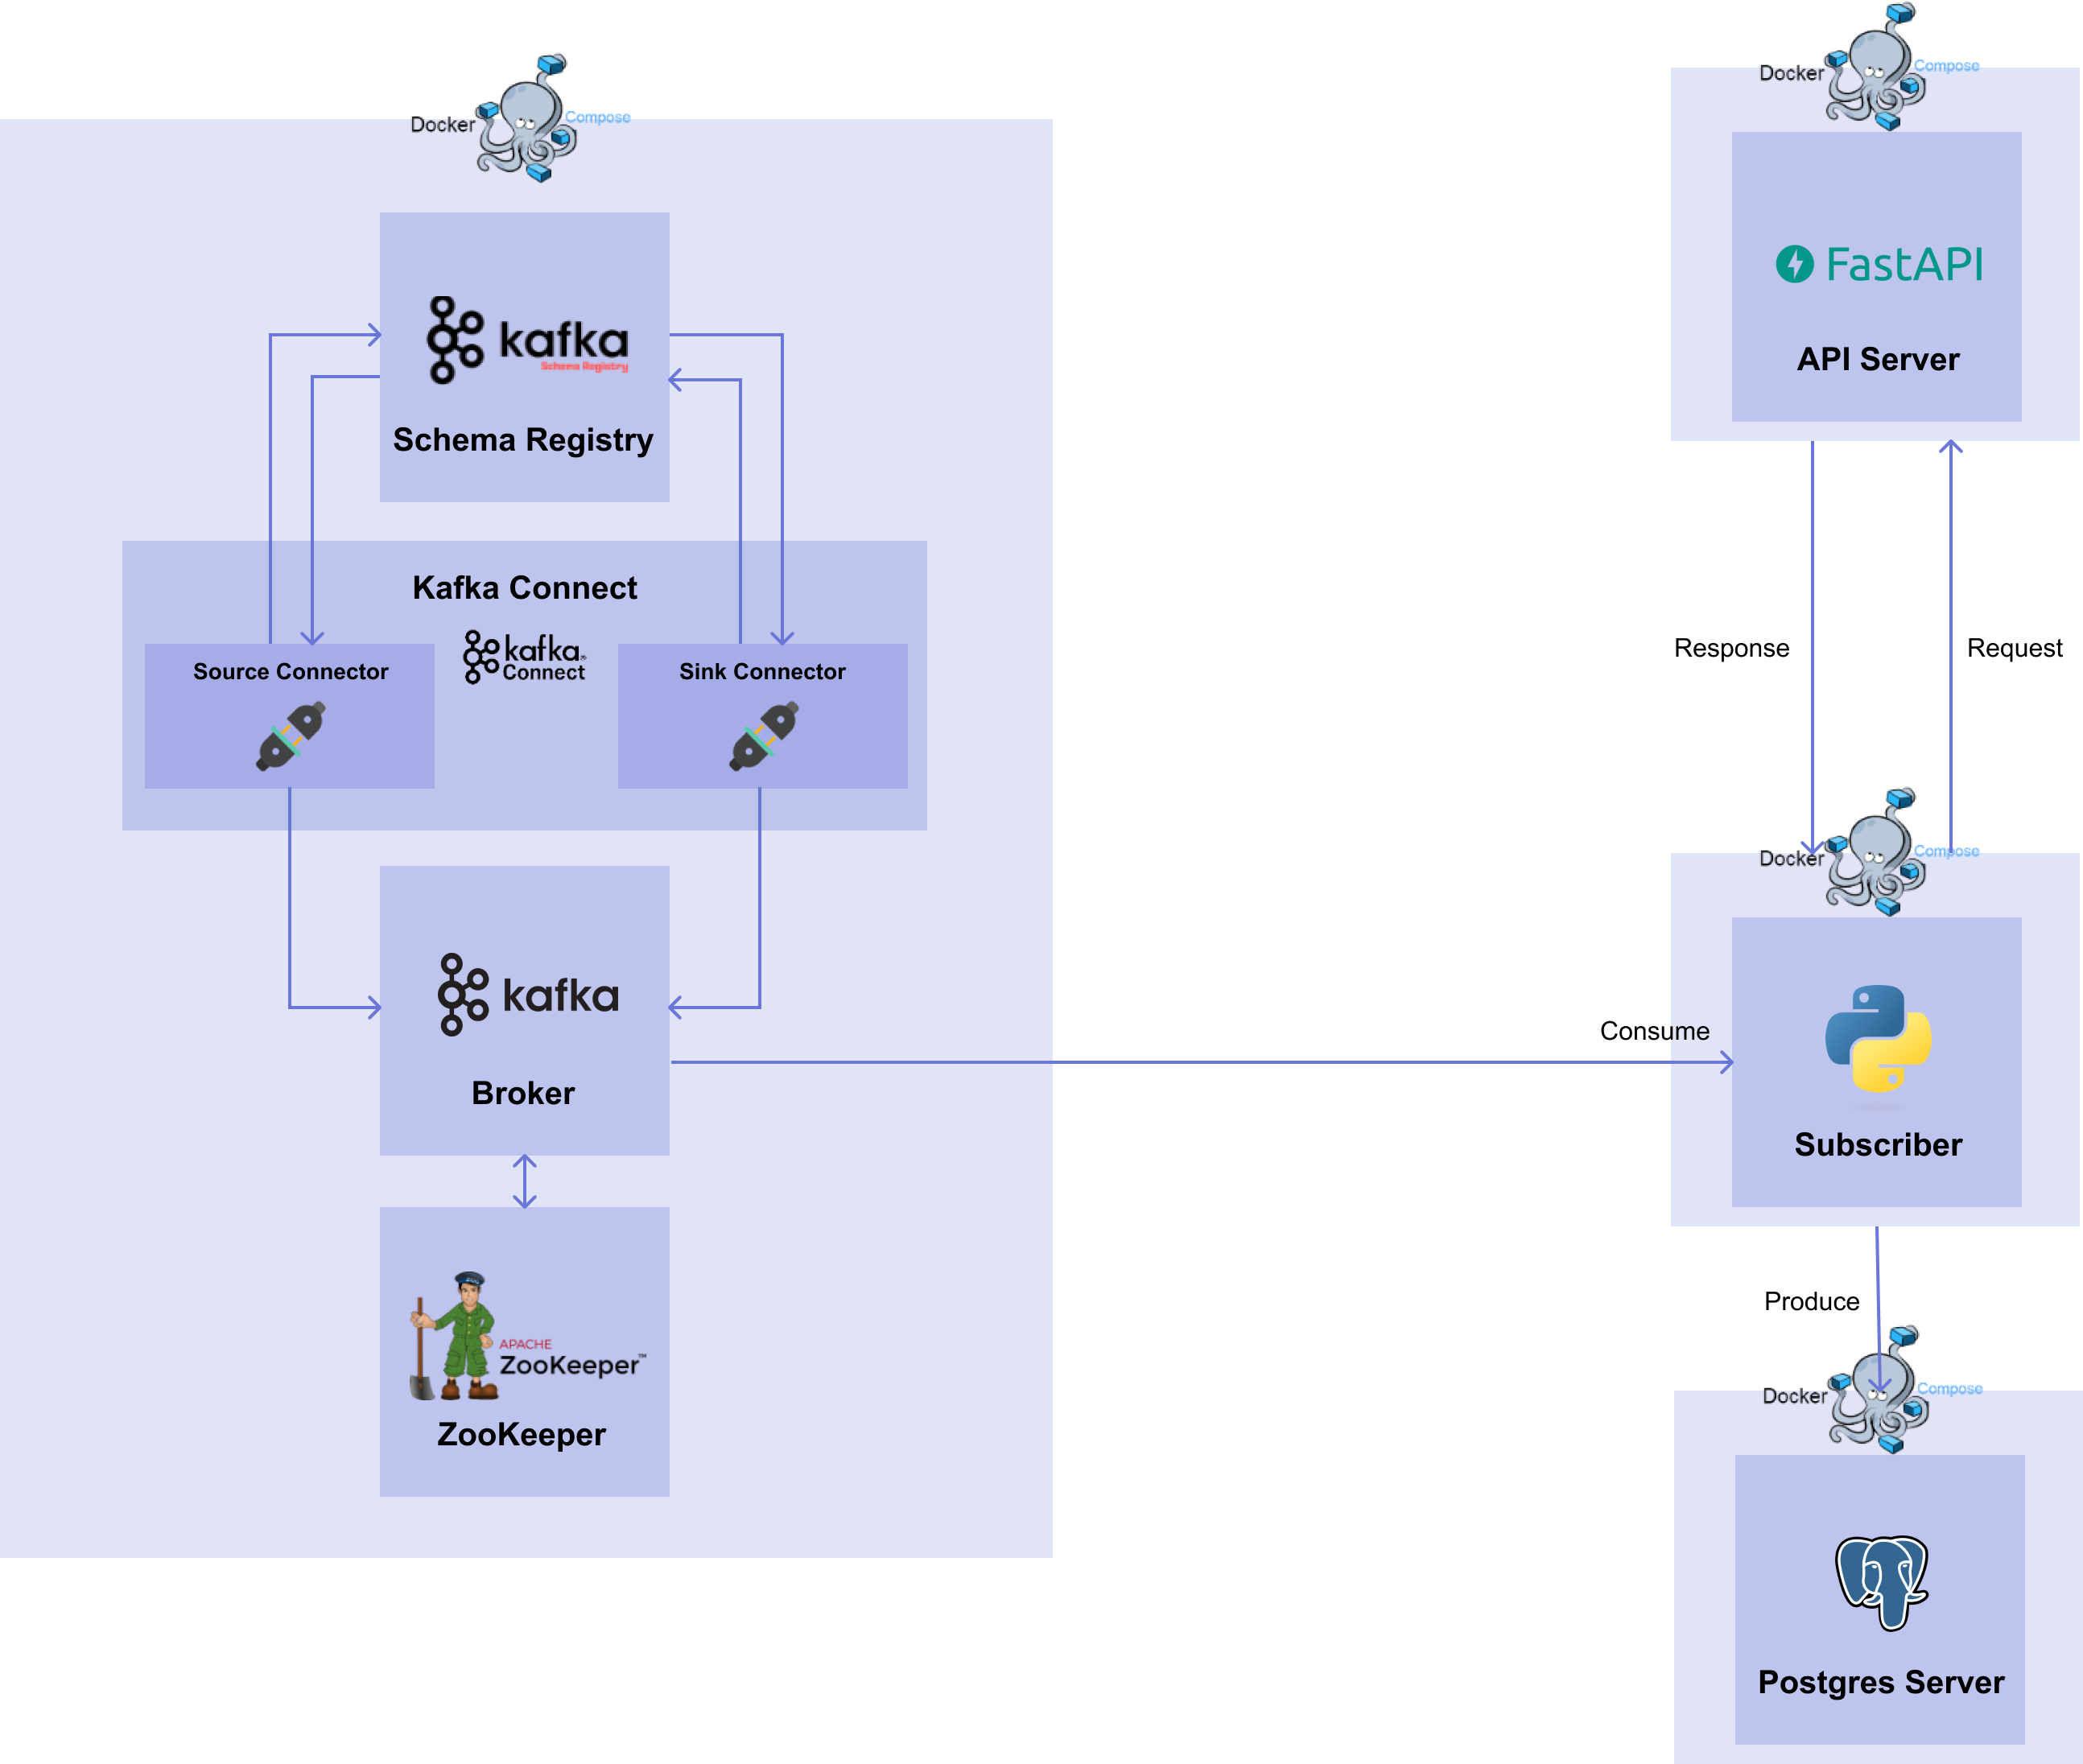 [그림 8-2] Stream Serving Workflow
07. Kafka 파트에서는 Source Connector 와 Sink Connector 를 생성하여 Source DB 에서 Target DB 로 데이터를 전달하는 과정을 살펴봤습니다.08. Stream 파트에서는 다시 Model Deployment 관점으로 돌아와서 Kafka 를 어떻게 쓸 지 살펴보겠습니다.
이번 파트에서는 07. Kafka 파트와 동일한 Zookeeper, Broker, Connect, Schema Registry 를 사용합니다. 또한 Source Connector 를 사용하여 데이터를 가져오는 과정도 동일합니다. 달라지는 점은 Sink Connector 를 대신해서 직접 Kafka Python SDK 를 이용하여 Consumer 를 구현하는 것입니다.
왜 직접 구현해서 사용해야 할까요?
07. Kafka 파트에서 사용한 Sink Connector 를 살펴 보면, 설정 파일을 통해 생성한 후 자동으로 Sink Connector 가 해당 토픽에 있는 데이터를 읽어서 Target DB 에 전달했습니다. 하지만 08. Stream 파트에서는 06. API serving 파트에서 생성한 API 서버에 request 를 보내고 response 를 받아야합니다. 이 과정에서 Sink Connector 를 쓰려면 토픽에서 데이터를 읽어서 전달할 endpoint 가 필요하지만, API Serving 에서는 수동으로 request 를 보내고 response 를 받기 때문에 Sink Connector 를 사용할 수가 없습니다.
따라서 Source DB 에서 데이터를 받아 API 서버로 요청을 보내고, 모델의 예측 값을 받고, 받은 결과를 Target DB 에 삽입하는 과정을 담당하는 코드가 필요합니다.
이번 챕터에서는 Sink Connector 없이 kafka-python, requests, psycopg2 패키지들을 이용하여 Data Subscriber 를 구축해보겠습니다.
2. Data Subscriber
이번에 구현할 Data Subscriber 의 절차는 다음과 같습니다.
psycopg2패키지를 이용하여 Target DB 에 접근하여 테이블을 생성합니다.kafka-python패키지를 이용하여 브로커의 토픽에 있는 데이터를 읽는 Consumer 를 생성합니다.requests패키지를 이용하여 Consumer 를 통해 받은 데이터를 06. API serving 파트에서 띄운 API 서버에 데이터를 보내고 예측값을 받습니다.psycopg2패키지를 이용하여 받은 response 를 Target DB 에 삽입합니다.
2.1 Prediction 테이블 생성
먼저, 예측값을 저장할 테이블을 생성합니다. 전반적인 코드는 01. Database 파트와 동일하며 다른 내용은 아래와 같습니다.
import psycopg2

def create_table(db_connect):
    create_table_query = """
    CREATE TABLE IF NOT EXISTS iris_prediction (
        id SERIAL PRIMARY KEY,
        timestamp timestamp,
        iris_class int
    );"""
    print(create_table_query)
    with db_connect.cursor() as cur:
        cur.execute(create_table_query)
        db_connect.commit()

if __name__ == "__main__":
    db_connect = psycopg2.connect(
        user="targetuser",
        password="targetpassword",
        host="target-postgres-server",
        port=5432,
        database="targetdatabase",
    )
    create_table(db_connect)
- Connection :
- user :
targetuser - password :
targetpassword - host :
target-postgres-server - port :
5432 - database :
targetdatabase
- user :
- Table name :
iris_prediction - Schema :
id (PK),timestamp (timestamp),iris_class (int)
2.2 Consumer 생성
다음으로, Consumer 를 생성하겠습니다.
kafka-python 패키지를 이용하여 KafkaConsumer 의 인스턴스를 만들겠습니다.
from json import loads
from kafka import KafkaConsumer

consumer = KafkaConsumer(
    "postgres-source-iris_data",
    bootstrap_servers="broker:29092",
    auto_offset_reset="earliest",
    group_id="iris-data-consumer-group",
    value_deserializer=lambda x: loads(x),
)
- topics:
- 데이터를 읽어들이고 싶은 토픽을 설정합니다.
- bootstrap_servers :
- Bootstrap 서버로 띄워져있는 브로커의
브로커 서비스 이름 : 브로커 서비스 내부 포트을 넣습니다.
- Bootstrap 서버로 띄워져있는 브로커의
- auto_offset_reset :
- 토픽에 있는 데이터를 어떤 offset 값부터 가져올 지 설정합니다.
- 2가지 설정이 있으며,
earliest는 가장 초기 offset 값,latest는 가장 마지막 offset 값입니다. - 이번 챕터에서는 첫번째 데이터부터 가져오고 싶기 때문에
earliest를 작성합니다.
- group_id :
- Consumer 그룹을 식별하기 위해 그룹 ID 를 설정합니다.
- value_deserializer :
- Source Connector (또는 Produceer) 에서 serialization 된 value 값을 deserialization 할 때 사용할 deserializer 를 설정합니다.
- 07. Kafka 파트에서는 Connect 를 띄울 때 value converter 로써 Json Converter 를 사용하였습니다. 따라서 데이터는 json 으로 serialization 이 되어있습니다.
- 이번 챕터에서는 데이터를 읽어서 Json Deserializer 를 이용하여 deserialization 을 해야 하기 때문에 lambda function 과 json 의
loads를 이용하여lambda x: loads(x)를 작성합니다.
이렇게 만들어진 Consumer 인스턴스는 for 문을 이용하여 토픽에 있는 데이터를 실시간으로 계속해서 가져올 수 있습니다.
for msg in consumer:
    print(
        f"Topic : {msg.topic}\n"
        f"Partition : {msg.partition}\n"
        f"Offset : {msg.offset}\n"
        f"Key : {msg.key}\n"
        f"Value : {msg.value}\n",
    )
# Topic : postgres-source-iris_data
# Partition : 0
# Offset : 133
# Key : None
# Value : {'schema': {'type': 'struct', 'fields': [{'type': 'int32', 'optional': False, 'field': 'id'}, {'type': 'string', 'optional': True, 'field': 'timestamp'}, {'type': 'double', 'optional': True, 'field': 'sepal_length'}, {'type': 'double', 'optional': True, 'field': 'sepal_width'}, {'type': 'double', 'optional': True, 'field': 'petal_length'}, {'type': 'double', 'optional': True, 'field': 'petal_width'}, {'type': 'int32', 'optional': True, 'field': 'target'}], 'optional': False, 'name': 'iris_data'}, 'payload': {'id': 134, 'timestamp': '2022-12-15 04:49:41.21', 'sepal_length': 6.1, 'sepal_width': 2.8, 'petal_length': 4.0, 'petal_width': 1.3, 'target': 1}}
#
# Topic : postgres-source-iris_data
# Partition : 0
# Offset : 134
# Key : None
# Value : {'schema': {'type': 'struct', 'fields': [{'type': 'int32', 'optional': False, 'field': 'id'}, {'type': 'string', 'optional': True, 'field': 'timestamp'}, {'type': 'double', 'optional': True, 'field': 'sepal_length'}, {'type': 'double', 'optional': True, 'field': 'sepal_width'}, {'type': 'double', 'optional': True, 'field': 'petal_length'}, {'type': 'double', 'optional': True, 'field': 'petal_width'}, {'type': 'int32', 'optional': True, 'field': 'target'}], 'optional': False, 'name': 'iris_data'}, 'payload': {'id': 135, 'timestamp': '2022-12-15 04:49:42.27', 'sepal_length': 6.2, 'sepal_width': 2.9, 'petal_length': 4.3, 'petal_width': 1.3, 'target': 1}}
#
# Topic : postgres-source-iris_data
# Partition : 0
# Offset : 135
# Key : None
# Value : {'schema': {'type': 'struct', 'fields': [{'type': 'int32', 'optional': False, 'field': 'id'}, {'type': 'string', 'optional': True, 'field': 'timestamp'}, {'type': 'double', 'optional': True, 'field': 'sepal_length'}, {'type': 'double', 'optional': True, 'field': 'sepal_width'}, {'type': 'double', 'optional': True, 'field': 'petal_length'}, {'type': 'double', 'optional': True, 'field': 'petal_width'}, {'type': 'int32', 'optional': True, 'field': 'target'}], 'optional': False, 'name': 'iris_data'}, 'payload': {'id': 225, 'timestamp': '2022-12-15 04:51:14.238', 'sepal_length': 6.7, 'sepal_width': 3.1, 'petal_length': 4.4, 'petal_width': 1.4, 'target': 1}}
Print 문과 출력된 형태를 통해 메시지에 있는 topic, partition, offset, key, value 을 볼 수 있습니다. 앞으로 사용할 데이터는 value 에 있는 payload 값입니다.
payload 값의 형태를 보면 아래와 같이 나오는 것을 볼 수 있습니다.
'payload': {'id': 134, 'timestamp': '2022-12-15 04:49:41.21', 'sepal_length': 6.1, 'sepal_width': 2.8, 'petal_length': 4.0, 'petal_width': 1.3, 'target': 1}
2.3 API 호출
다음 과정은 읽어드린 데이터를 06. API Serving 파트에서 생성한 API 서버에 전달하고, 예측값을 받는 것입니다.
2.3.1 Schema 확인
먼저 06. API Serving 파트에서 띄워둔 API 서버의 schema 를 살펴보겠습니다.
from pydantic import BaseModel

class PredictIn(BaseModel):
    sepal_length: float
    sepal_width: float
    petal_length: float
    petal_width: float

class PredictOut(BaseModel):
    iris_class: int
API 서버에 request 로 보낼 값들에는 sepal_length, sepal_width, petal_length, petal_width column 이 있고, response 로 받는 값들에는 iris_class column 이 있습니다.
2.3.2 API 요청 및 응답
API 서버에 request 로 보낼 값들 중 payload 에서 필요없는 column 들을 아래와 같이 삭제합니다.
msg.value["payload"].pop("id")
msg.value["payload"].pop("target")
ts = msg.value["payload"].pop("timestamp")
timestamp 의 경우, Source DB 에서 나온 timestamp 를 Target DB 에 넣어줄 것이기 때문에 똑같이 삭제는 하되, ts 변수로 할당해줍니다.
이제 requests 패키지에 있는 POST method 를 이용하여 payload 값들을 보내고 response 를 받습니다.
response = requests.post(
    url="http://api-with-model:8000/predict",
    json=msg.value["payload"],
    headers={"Content-Type": "application/json"},
).json()
response["timestamp"] = ts
- url :
- API 서버의 endpoint 를 설정합니다.
- 이번 챕터에서는 API 서버의 호스트 이름과 포트, 그리고 POST method 인 predict 를 합하여
http://api-with-model:8000/predict로 넣어줍니다.
- json :
- request 로 보낼 인자값들을 명시합니다.
- 이번 챕터에서는 payload 값인
msg.value["payload"]를 넣어줍니다.
- headers :
- Client 에서 Server 로 request 를 보낼 때 부가적인 정보를 전송할 수 있도록 설정합니다.
- 이번 챕터에서는 보낼 때 json 형식으로 보낼 것이기 때문에
{"Content-Type": "application/json"}header 로 적어줍니다.
Response 를 받고 난 뒤에 아까 남겨두었던
ts변수를 response 에 넣어줍니다.
2.4 Prediction 테이블에 예측값 삽입
마지막으로 01. Database 파트에서 사용했던 insert_data 함수를 이용하여 response 에 담긴 데이터를 Target DB 에 삽입합니다.
def insert_data(db_connect, data):
    insert_row_query = f"""
    INSERT INTO iris_prediction
        (timestamp, iris_class)
        VALUES (
            '{data["timestamp"]}',
            {data["iris_class"]}
        );"""
    print(insert_row_query)
    with db_connect.cursor() as cur:
        cur.execute(insert_row_query)
        db_connect.commit()

insert_data(db_connect, response)
2.5 data_subscriber.py
앞서 살펴봤던 모든 코드들은 다음과 같습니다.
# data_subscriber.py
from json import loads

import psycopg2
import requests
from kafka import KafkaConsumer


def create_table(db_connect):
    create_table_query = """
    CREATE TABLE IF NOT EXISTS iris_prediction (
        id SERIAL PRIMARY KEY,
        timestamp timestamp,
        iris_class int
    );"""
    print(create_table_query)
    with db_connect.cursor() as cur:
        cur.execute(create_table_query)
        db_connect.commit()


def insert_data(db_connect, data):
    insert_row_query = f"""
    INSERT INTO iris_prediction
        (timestamp, iris_class)
        VALUES (
            '{data["timestamp"]}',
            {data["iris_class"]}
        );"""
    print(insert_row_query)
    with db_connect.cursor() as cur:
        cur.execute(insert_row_query)
        db_connect.commit()


def subscribe_data(db_connect, consumer):
    for msg in consumer:
        print(
            f"Topic : {msg.topic}\n"
            f"Partition : {msg.partition}\n"
            f"Offset : {msg.offset}\n"
            f"Key : {msg.key}\n"
            f"Value : {msg.value}\n",
        )

        msg.value["payload"].pop("id")
        msg.value["payload"].pop("target")
        ts = msg.value["payload"].pop("timestamp")

        response = requests.post(
            url="http://api-with-model:8000/predict",
            json=msg.value["payload"],
            headers={"Content-Type": "application/json"},
        ).json()
        response["timestamp"] = ts
        insert_data(db_connect, response)


if __name__ == "__main__":
    db_connect = psycopg2.connect(
        user="targetuser",
        password="targetpassword",
        host="target-postgres-server",
        port=5432,
        database="targetdatabase",
    )
    create_table(db_connect)

    consumer = KafkaConsumer(
        "postgres-source-iris_data",
        bootstrap_servers="broker:29092",
        auto_offset_reset="earliest",
        group_id="iris-data-consumer-group",
        value_deserializer=lambda x: loads(x),
    )
    subscribe_data(db_connect, consumer)
3. Docker Compose
3.1 Dockerfile
Data Subscriber 코드를 Docker 에서 실행할 Dockerfile 을 만듭니다.
FROM amd64/python:3.9-slim

WORKDIR /usr/app

RUN pip install -U pip &&\
    pip install psycopg2-binary kafka-python requests

COPY data_subscriber.py data_subscriber.py

ENTRYPOINT ["python", "data_subscriber.py"]
3.2 Docker Compose
Dockerfile 을 이용하여 Docker Compose 파일을 구성하면 아래와 같습니다.
# stream-docker-compose.yaml
version: "3"

services:
  data-subscriber:
    build:
      context: .
      dockerfile: Dockerfile
    container_name: data-subscriber

networks:
  default:
    name: mlops-network
    external: true
- 서비스들을 연결할 Docker Network 는 01. Database 파트에서 생성한
mlops-network네트워크를 사용합니다.
3.3 실행
docker compose 명령어를 이용하여 Data Subscriber 서비스를 생성합니다.
docker compose -p part8-stream -f stream-docker-compose.yaml up -d
- -p :
- Project name 은
part8-stream로 사용합니다.
- Project name 은
- -f :
- File name 은 위에서 작성한 파일 이름인
stream-docker-compose.yaml을 적어줍니다.
- File name 은 위에서 작성한 파일 이름인
3.4 데이터 확인
psql로 Target DB 에 접속합니다.$ PGPASSWORD=targetpassword psql -h localhost -p 5433 -U targetuser -d targetdatabase
psql (14.6, server 14.0 (Debian 14.0-1.pgdg110+1))
Type "help" for help.
targetdatabase=#Select 문을 작성하여
iris_prediction테이블에 있는 데이터를 확인합니다.targetdatabase=# SELECT * FROM iris_prediction LIMIT 100;
id | timestamp | iris_class
-----+-------------------------+------------
1 | 2022-12-21 23:31:12.705 | 1
2 | 2022-12-21 23:31:13.804 | 2
3 | 2022-12-21 23:31:14.815 | 2
4 | 2022-12-21 23:31:15.828 | 2
5 | 2022-12-21 23:31:16.835 | 1
6 | 2022-12-21 23:31:17.848 | 1
7 | 2022-12-21 23:31:18.854 | 1
8 | 2022-12-21 23:31:19.863 | 0
9 | 2022-12-21 23:31:20.875 | 2