5) Source Connector
Chapter Preview
목표
- Connect 에 Source Connector 를 생성합니다.
- 토픽에 쌓인 데이터를 확인합니다.
스펙 명세서
Source Connector 를 띄우기 위한 설정 파일을 만듭니다.
{
    "name": "postgres-source-connector",
    "config": {
        "connector.class": "io.confluent.connect.jdbc.JdbcSourceConnector",
        "connection.url": "jdbc:postgresql://postgres-server:5432/mydatabase",
        "connection.user": "myuser",
        "connection.password": "mypassword",
        "table.whitelist": "iris_data",
        "topic.prefix": "postgres-source-",
        "topic.creation.default.partitions": 1,
        "topic.creation.default.replication.factor": 1,
        "mode": "incrementing",
        "incrementing.column.name": "id",
        "tasks.max": 2,
        "transforms": "TimestampConverter",
        "transforms.TimestampConverter.type": "org.apache.kafka.connect.transforms.TimestampConverter$Value",
        "transforms.TimestampConverter.field": "timestamp",
        "transforms.TimestampConverter.format": "yyyy-MM-dd HH:mm:ss.S",
        "transforms.TimestampConverter.target.type": "string"
    }
}curl명령어를 이용하여 POST method 로 Source Connector 를 생성합니다.- URL :
http://localhost:8083/connectors - Header :
Content-Type: application/json
- URL :
kafkacat을 이용하여 토픽에 쌓인 데이터를 확인합니다.
해당 파트의 전체 코드는 mlops-for-mle/part7/ 에서 확인할 수 있습니다.
part7
├── Makefile
├── README.md
├── connect.Dockerfile
├── create_table.py
├── kafka-docker-compose.yaml
├── naive-docker-compose.yaml
├── sink_connector.json
├── source_connector.json
├── target-docker-compose.yaml
└── target.Dockerfile
1. Architecture
[그림 7-14]은 이번 실습에서 다룰 서비스들의 다이어그램입니다.
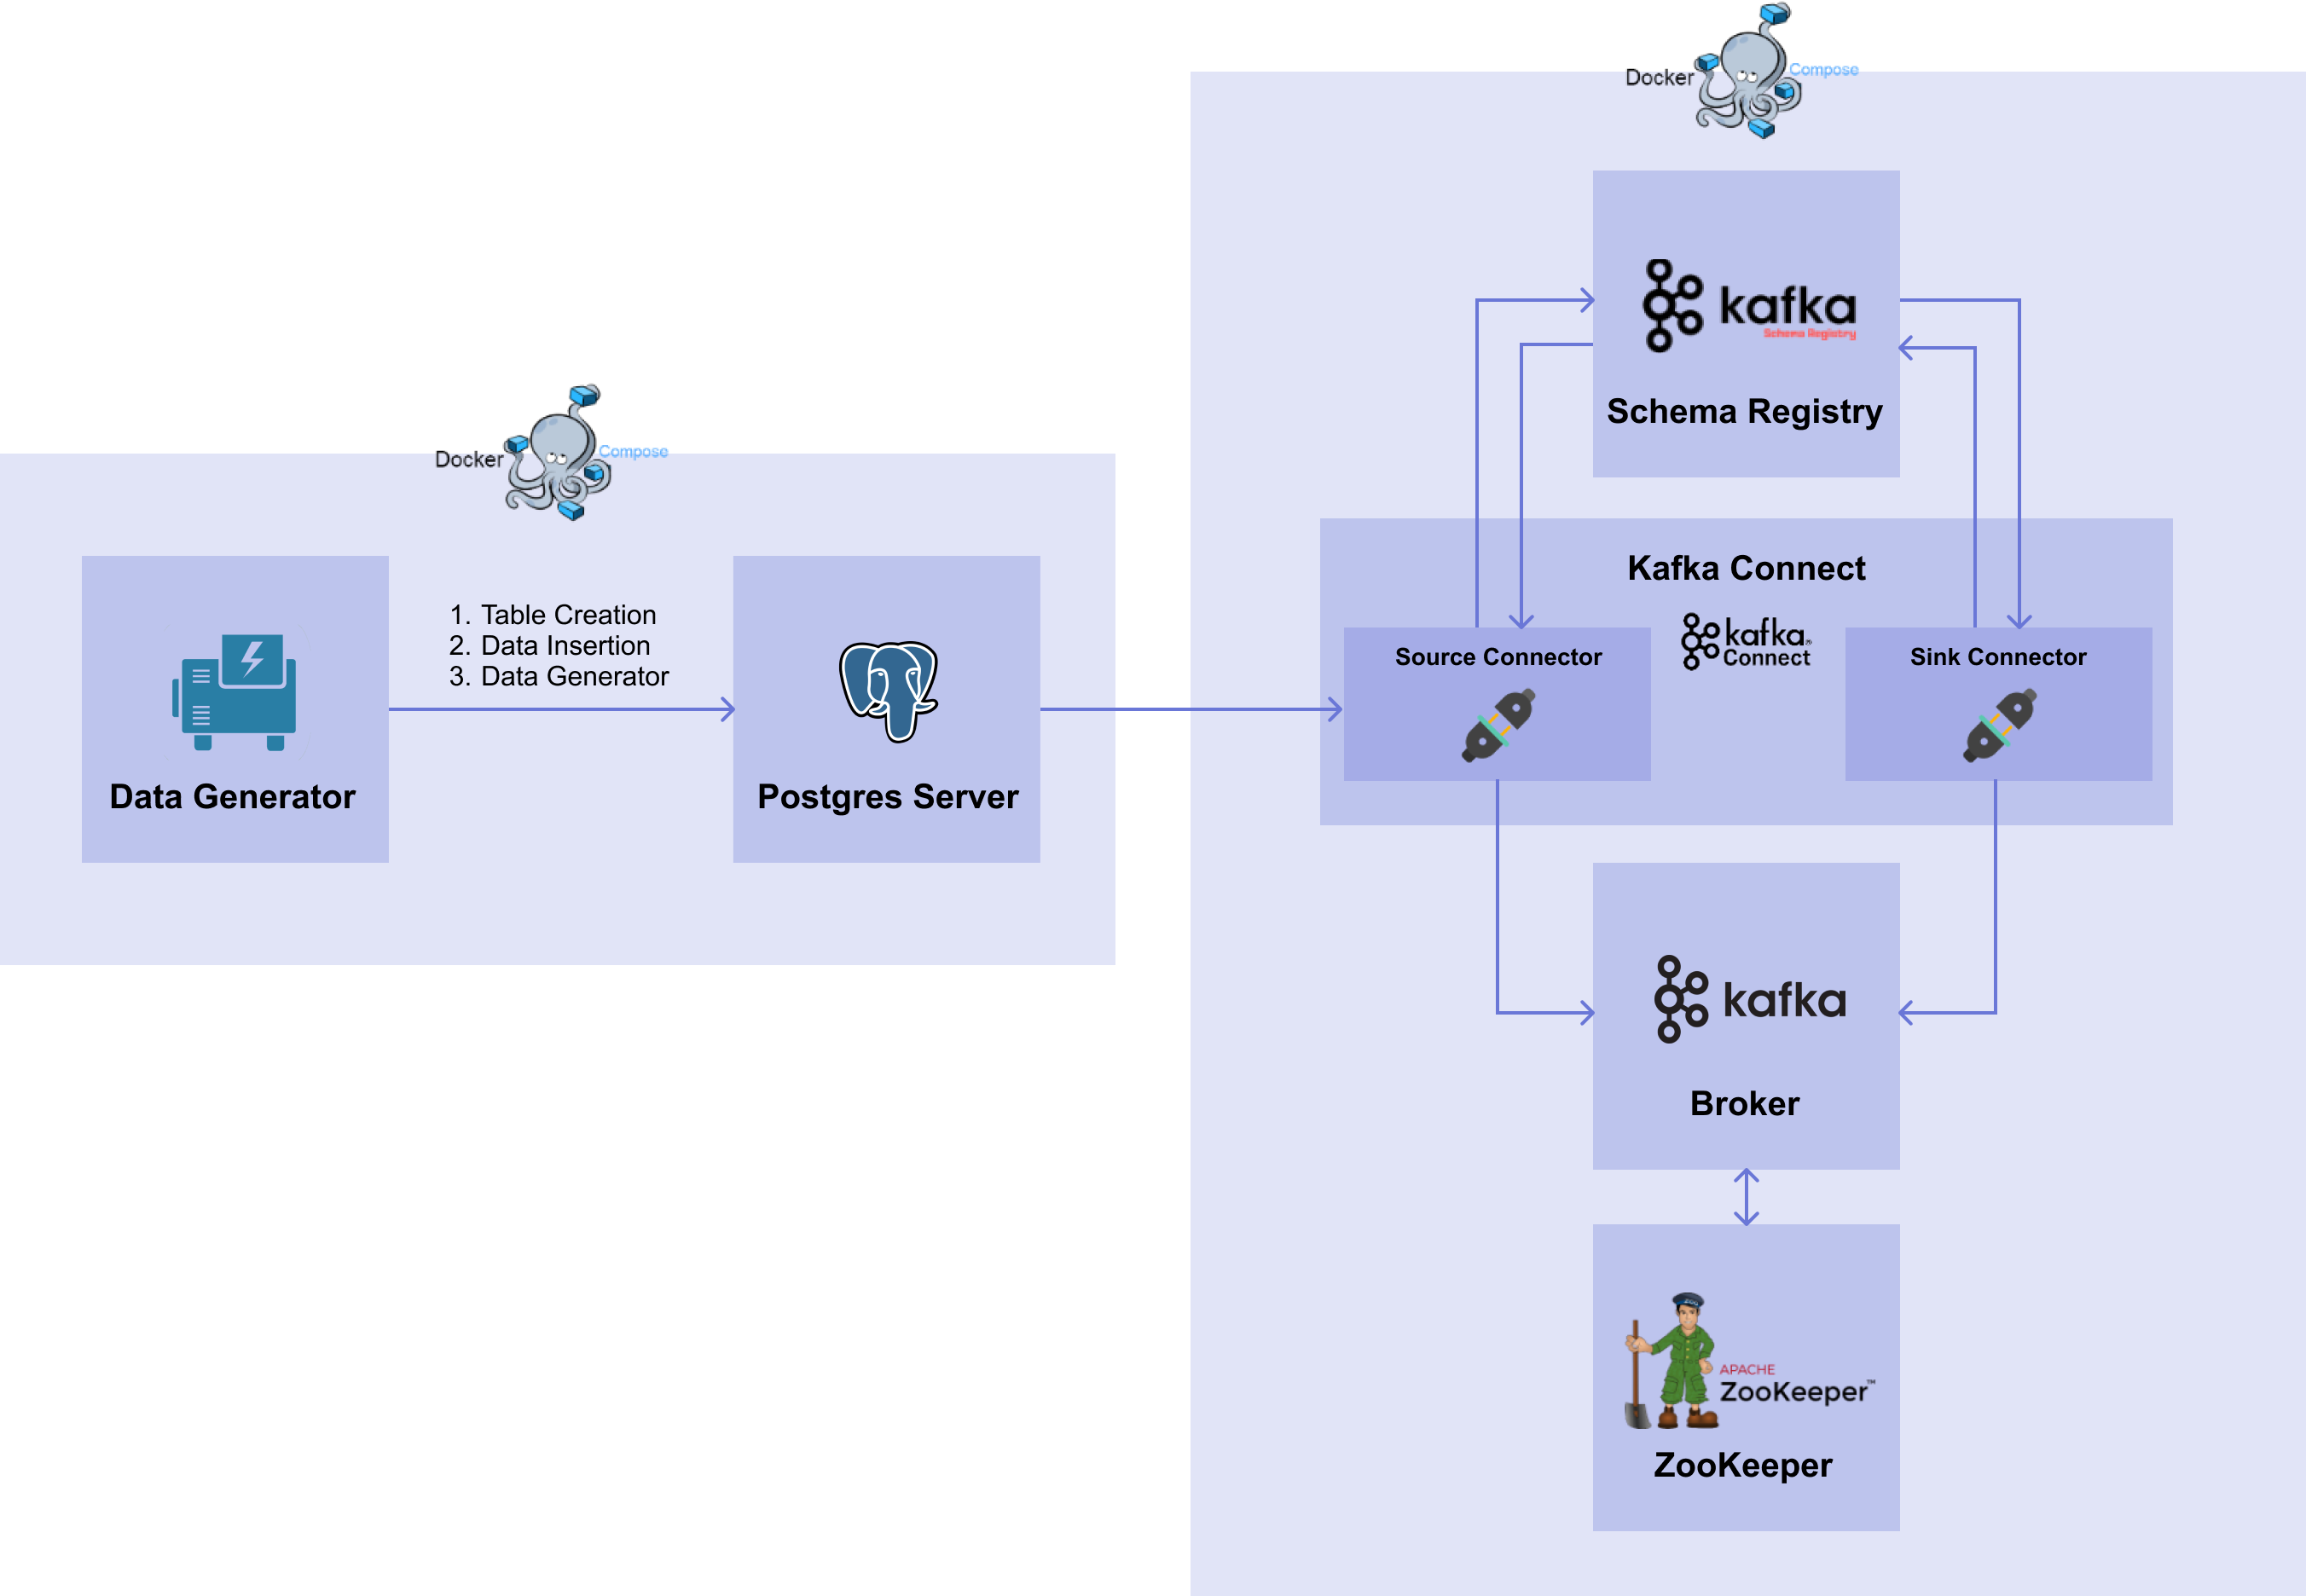 [그림7-14] Kafka System with Source Connector
📌 해당 파트는 01. Database 파트의 DB 를 이용합니다.
📌 DB 를 띄우지 않은 경우 01. Database 파트를 완료하고 DB 가 띄워진 상태에서 진행해주세요.
이번 챕터에서는 01. Database 파트의 DB 에 있는 iris 데이터를 가져오는 Source Connector 를 생성해보겠습니다.
2. Source Connector
2.1 생성
Source Connector 는 Connect 에 API 호출을 통해 생성합니다.
아래 명령어를 통해 Source Connector 를 띄울 수 있는 source_connector.json 을 생성합니다.
cat <<EOF > source_connector.json
{
    "name": "postgres-source-connector",
    "config": {
        "connector.class": "io.confluent.connect.jdbc.JdbcSourceConnector",
        "connection.url": "jdbc:postgresql://postgres-server:5432/mydatabase",
        "connection.user": "myuser",
        "connection.password": "mypassword",
        "table.whitelist": "iris_data",
        "topic.prefix": "postgres-source-",
        "topic.creation.default.partitions": 1,
        "topic.creation.default.replication.factor": 1,
        "mode": "incrementing",
        "incrementing.column.name": "id",
        "tasks.max": 2,
        "transforms": "TimestampConverter",
        "transforms.TimestampConverter.type": "org.apache.kafka.connect.transforms.TimestampConverter$Value",
        "transforms.TimestampConverter.field": "timestamp",
        "transforms.TimestampConverter.format": "yyyy-MM-dd HH:mm:ss.S",
        "transforms.TimestampConverter.target.type": "string"
    }
}
EOF
생성하는 Source Connector 에 대한 설정 파일은 다음과 같습니다.
참고로 2) Producer & Consumer 챕터와는 다르게 Source Connector 생성 시 자동으로 토픽을 만들어주기 때문에 추가적으로 토픽을 생성하는 명령어를 입력하지 않습니다.
{
    "name": "postgres-source-connector",
    "config": {
        "connector.class": "io.confluent.connect.jdbc.JdbcSourceConnector",
        "connection.url": "jdbc:postgresql://postgres-server:5432/mydatabase",
        "connection.user": "myuser",
        "connection.password": "mypassword",
        "table.whitelist": "iris_data",
        "topic.prefix": "postgres-source-",
        "topic.creation.default.partitions": 1,
        "topic.creation.default.replication.factor": 1,
        "mode": "incrementing",
        "incrementing.column.name": "id",
        "tasks.max": 2,
        "transforms": "TimestampConverter",
        "transforms.TimestampConverter.type": "org.apache.kafka.connect.transforms.TimestampConverter$Value",
        "transforms.TimestampConverter.field": "timestamp",
        "transforms.TimestampConverter.format": "yyyy-MM-dd HH:mm:ss.S",
        "transforms.TimestampConverter.target.type": "string"
    }
}
- name :
- Connector 의 이름을 정합니다.
- config :
- connector.class :
- Connector 를 생성하기 위한 class 를 설정합니다.
- 이번 챕터에서는 JDBC Source Connector 를 사용함으로
io.confluent.connect.jdbc.JdbcSourceConnector를 기입합니다.
- connection.url :
- Source DB 에 접근하기 위한 주소를 설정합니다.
- 이번 챕터에서는 01. Database 파트에서 띄워두었던 postgres server 의 URL 인
jdbc:postgresql://postgres-server:5432/mydatabase을 입력합니다.
- connection.user :
- Source DB 에 접속하기 위한 유저 이름을 설정합니다.
- connection.password :
- Source DB 에 접속하기 위한 유저의 비밀번호를 설정합니다.
- table.whitelist :
- 데이터를 가져올 테이블의 목록을 설정합니다.
- 복수 개의 테이블에서 데이터를 가져오는 경우 콤마(,)를 통해서 작성할 수 있습니다.
- 이번 챕터에서는 한 개의 테이블만 가져올 것이기 때문에 postgres server 에 있는
iris_data테이블만 적어줍니다.
- topic.prefix :
- 토픽 생성 시 이름 앞에 붙일 prefix 를 설정합니다.
- 이 부분에서 작성한 prefix 와 테이블 이름이 최종 토픽의 이름이 됩니다.
- 이번 챕터에서는
postgres-source-라는 prefix 를 사용하겠습니다.
- topic.creation.default.partitions :
- 토픽 자동 생성을 위해 반드시 설정되어야 하는 값입니다.
- Source Connector 를 실행했을 때 토픽이 존재하지 않는다면 자동으로 topic을 생성할 수 있습니다.
이때 한 가지 조건이 존재하는데 먼저 설정 파일에서topic.creation.enable=true로 설정해야 합니다. (이 값의 기본값은 true 이므로 따로 설정하지 않아도 됩니다.) 이렇게 하면 자동으로default라는 이름으로 Topic Create Group 이 생성되는데, 이 그룹이 토픽 생성을 담당합니다. - 이 옵션은
default그룹에서 토픽을 자동 생성할 때 파티션의 수를 설정합니다.
- topic.creation.default.replication.factor :
- 위와 마찬가지로 토픽 자동 생성을 위해 반드시 설정되어야 하는 값입니다.
- 이 옵션은
default그룹으로 토픽을 자동 생성할 때 Replication Factor 의 수를 설정합니다.
- mode :
테이블에 변경이 발생했을 때 어떤 방식으로 데이터를 가져올지 설정합니다.
- mode 는 총 4개로 bulk, timestamp, incrementing, timestamp+incrementing 이 있습니다.
- bulk 는 event 가 발생한 테이블의 내용을 모두 가져옵니다.
- timestamp 는 timestamp column 을 통해서 들어온 row 를 신규로 판단하고, 해당 데이터만 가져옵니다.
- incrementing 은 incrementing column 을 통해서 들어온 row 를 신규로 판단하고, 해당 데이터만 가져옵니다. 여기서 주의해야할 점은 incrementing 모드의 경우에 "삭제 (delete)" 와 "수정 (update)" 에 대해서는 작동하지 않는다는 점입니다. 따라서 삭제와 수정 정보도 가져오고 싶다면 shadow 테이블을 만들어야 합니다.
- timestamp+incrementing 은 timestamp column 과 incrementing column 2개의 column 을 사용하여 들어온 row 를 신규로 판단하고, 해당 데이터만 가져옵니다.
이번 챕터에서는
incrementing을 사용하겠습니다.
- incrementing.column.name :
- Incrementing column 의 이름을 설정합니다.
- 이번 챕터에서는
id를 기입합니다. 이렇게 되면id라는 column 을 보고 어떤 row 부터 가져올 지 판단합니다. 참고로 설정한 column 의 유형이 varchar 인 경우 에러가 납니다.
- tasks.max :
- Connector 에서 task 의 수를 얼마나 가져갈 지를 설정합니다.
- transforms :
- 01. Database 파트의 DB 에 있는 iris_data 테이블에는 timestamp column 은 Source Connector 를 이용하여 데이터를 가져올 경우, type 이 Unix Epoch Time 으로 변경됩니다. 따라서 Source Connector 를 생성할 때 transforms 에 있는 Timestamp Converter 를 이용하여 Unix Epoch Time 을 timestamp type 으로 변경 후, 토픽에 넣을 때는 string 으로 넣어야 합니다.
- Transformation 을 적용할 Converter 를 설정합니다.
- transforms.TimestampConverter.type :
- Timestamp Converter 의 type 을 설정합니다.
- Timestamp column 은 key 에 있는 값이 아닌 value 에 있는 값이므로 value 에 대한 Timestamp Converter 를 사용합니다.
- transforms.TimestampConverter.field :
- Timestamp Converter 를 적용할 field 를 설정합니다.
- iris_data 테이블에 있는 timestamp column 을 기입합니다.
- transforms.TimestampConverter.format :
- Timestamp Converter 의 format 을 설정합니다.
- Timestamp 의 format 인
yyyy-MM-dd HH:mm:ss.S를 기입합니다.
- transforms.TimestampConverter.target.type :
- Timestamp Converter 를 이용하여 변환한 후에 적용할 type 을 설정합니다.
- 브로커의 토픽에 넣기 위해
string을 기입합니다.
- connector.class :
이제 Source Connector 생성하는 json 파일을 curl 을 이용하여 Connect 의 REST API 에 POST method 로 보냅니다.
curl -X POST http://localhost:8083/connectors -H "Content-Type: application/json" -d @source_connector.json
명령어를 실행하면 아래와 같이 출력됩니다.
{"name":"postgres-source-connector","config":{"connector.class":"io.confluent.connect.jdbc.JdbcSourceConnector","connection.url":"jdbc:postgresql://postgres-server:5432/mydatabase","connection.user":"myuser","connection.password":"mypassword","table.whitelist":"iris_data","topic.prefix":"postgres-source-","topic.creation.default.partitions":"1","topic.creation.default.replication.factor":"1","mode":"incrementing","incrementing.column.name":"id","tasks.max":"2","name":"postgres-source-connector"},"tasks":[],"type":"source"}%
2.2 생성 확인
아래의 GET method 로 현재 Connector 목록을 확인할 수 있습니다. 앞서 생성한 Connector 가 잘 있는지 확인합니다.
curl -X GET http://localhost:8083/connectors
실행하면 아래와 같이 출력됩니다.
["postgres-source-connector"]%
이어서 postgres-source-connector 의 정보를 확인합니다.
curl -X GET http://localhost:8083/connectors/postgres-source-connector
실행하면 아래와 같이 출력됩니다.
{"name":"postgres-source-connector","config":{"connector.class":"io.confluent.connect.jdbc.JdbcSourceConnector","mode":"incrementing","incrementing.column.name":"id","topic.prefix":"postgres-source-","topic.creation.default.partitions":"1","connection.password":"mypassword","connection.user":"myuser","tasks.max":"2","topic.creation.default.replication.factor":"1","name":"postgres-source-connector","connection.url":"jdbc:postgresql://postgres-server:5432/mydatabase","table.whitelist":"iris_data"},"tasks":[],"type":"source"}%
2.3 Topic 에 쌓인 데이터 확인
이제 토픽에 데이터가 잘 쌓이고 있는지 확인합니다. 이번 챕터에서는 kafkacat 을 이용하여 확인합니다.
Linux
apt-get install kafkacat
MacOS
brew install kcat
더 자세한 설치는 공식 홈페이지를 참고하세요.
kcat 명령어를 이용하여 모든 토픽 리스트를 확인합니다.
kcat -L -b localhost:9092
중간에 postgres-source-iris_data 토픽이 생성된 것을 볼 수 있습니다.
.
.
.
topic "postgres-source-iris_data" with 1 partitions:
    partition 0, leader 1, replicas: 1, isrs: 1
.
.
.
kcat 명령어를 이용하여 postgres-source-iris_data 토픽에 쌓인 데이터를 확인합니다.
kcat -b localhost:9092 -t postgres-source-iris_data
실행하면 아래와 같이 데이터가 쌓이고 있는 것을 확인할 수 있습니다.
{"schema":{"type":"struct","fields":[{"type":"int32","optional":false,"field":"id"},{"type":"double","optional":true,"field":"sepal_length"},{"type":"double","optional":true,"field":"sepal_width"},{"type":"double","optional":true,"field":"petal_length"},{"type":"double","optional":true,"field":"petal_width"},{"type":"int32","optional":true,"field":"target"}],"optional":false,"name":"iris_data"},"payload":{"id":187,"sepal_length":6.5,"sepal_width":3.0,"petal_length":5.8,"petal_width":2.2,"target":2}}
{"schema":{"type":"struct","fields":[{"type":"int32","optional":false,"field":"id"},{"type":"double","optional":true,"field":"sepal_length"},{"type":"double","optional":true,"field":"sepal_width"},{"type":"double","optional":true,"field":"petal_length"},{"type":"double","optional":true,"field":"petal_width"},{"type":"int32","optional":true,"field":"target"}],"optional":false,"name":"iris_data"},"payload":{"id":188,"sepal_length":6.0,"sepal_width":2.2,"petal_length":5.0,"petal_width":1.5,"target":2}}
{"schema":{"type":"struct","fields":[{"type":"int32","optional":false,"field":"id"},{"type":"double","optional":true,"field":"sepal_length"},{"type":"double","optional":true,"field":"sepal_width"},{"type":"double","optional":true,"field":"petal_length"},{"type":"double","optional":true,"field":"petal_width"},{"type":"int32","optional":true,"field":"target"}],"optional":false,"name":"iris_data"},"payload":{"id":189,"sepal_length":7.0,"sepal_width":3.2,"petal_length":4.7,"petal_width":1.4,"target":1}}
{"schema":{"type":"struct","fields":[{"type":"int32","optional":false,"field":"id"},{"type":"double","optional":true,"field":"sepal_length"},{"type":"double","optional":true,"field":"sepal_width"},{"type":"double","optional":true,"field":"petal_length"},{"type":"double","optional":true,"field":"petal_width"},{"type":"int32","optional":true,"field":"target"}],"optional":false,"name":"iris_data"},"payload":{"id":190,"sepal_length":6.9,"sepal_width":3.2,"petal_length":5.7,"petal_width":2.3,"target":2}}
{"schema":{"type":"struct","fields":[{"type":"int32","optional":false,"field":"id"},{"type":"double","optional":true,"field":"sepal_length"},{"type":"double","optional":true,"field":"sepal_width"},{"type":"double","optional":true,"field":"petal_length"},{"type":"double","optional":true,"field":"petal_width"},{"type":"int32","optional":true,"field":"target"}],"optional":false,"name":"iris_data"},"payload":{"id":191,"sepal_length":5.6,"sepal_width":2.7,"petal_length":4.2,"petal_width":1.3,"target":1}}
% Reached end of topic postgres-source-iris_data [0] at offset 191